
There are many reasons to include OneSignal (aka the OneSignalNotificationServiceExtension) in your own app. But there are also good reasons to remove the popular framework from your app. For example, if you don’t need it and want to save app storage space. Or because otherwise, problems with the app submission or other frameworks occur. This guide will help you remove OneSignal from your iOS app built with the WebViewGold app template.
Following this guide will produce a lot of code dependency errors that need to be fixed (see step 4), so the easiest suggestion would be to choose the option to disable that framework in WebViewGold as described in the documentation. WebViewGold only loads the required frameworks that are activated by you in order to provide the best performance.
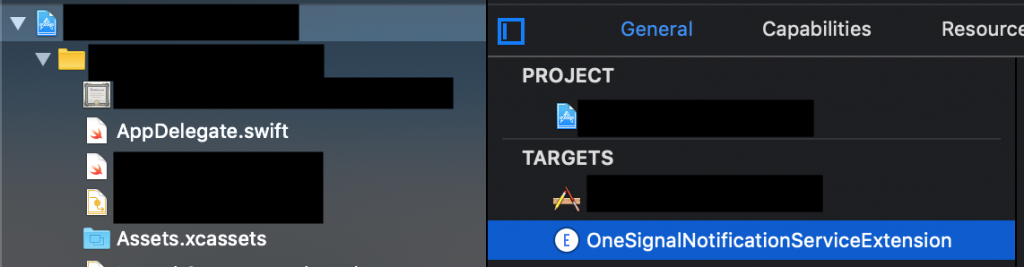
Step 1: Remove the OneSignal Notification Extension
In your Xcode project, navigate to the General tab, choose the OneSignalNotificationServiceExtension target, and click Edit / Delete.
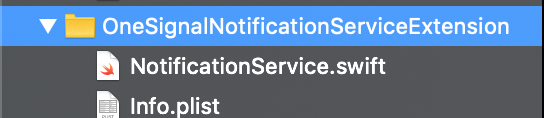
Afterward, please select the OneSignalNotificationServiceExtension folder from the left sidebar and choose Edit / Delete, too. When asked if you want to remove the references or the whole files, choose Move To Trash:
Step 2: Remove the OneSignal pod entry
Open your Podfile (in the root folder of the Xcode project) using TextEdit (or any other code-compatible editor) and remove the reference to the OneSignal pod:
pod 'OneSignal', '>= 2.6.2', '< 3.0'Also, remove this chunk and everything inside that chunk:
target 'OneSignalNotificationServiceExtension' do
  pod 'OneSignal', '>= 2.6.2', '< 3.0'
  ...
  ...
end
Step 3: Clean your AppDelegate.swift file
Open your AppDelegate.swift file and remove the following chunks:
import OneSignaland
if Constants.kPushEnabled
        {
            let onesignalInitSettings = [kOSSettingsKeyAutoPrompt: true,
                                         kOSSettingsKeyInAppLaunchURL: true]


            OneSignal.initWithLaunchOptions(launchOptions,appId: "xxxxx-xxxxx-xxxxx-xxxxx-xxxxx",handleNotificationAction: {(result) in let payload = result?.notification.payload
                if let additionalData = payload?.additionalData {
                    let noti_url = additionalData["url"] as! String
                    UserDefaults.standard.set(noti_url, forKey: "Noti_Url")
                    NotificationCenter.default.post(name: NSNotification.Name(rawValue: "OpenWithNotificationURL"), object: nil, userInfo: nil)

                }},settings: onesignalInitSettings)

            OneSignal.inFocusDisplayType = OSNotificationDisplayType.inAppAlert;

        }
Step 4: Click “Build” and fix all dependency errors
Now it is time for Xcode to build the app. To do this, click on the play icon (“Build”). There will be some errors (red icons). Click on each error in turn and fix it by commenting out or deleting the corresponding line (or the complete code block if it’s a function or e.g., an if/else operation).
Enjoy!
Again: Following this guide will produce a lot of code dependency errors that need to be fixed (see step 4), so the easiest suggestion would be to choose the option to disable that framework in WebViewGold as described in the documentation. WebViewGold only loads the required frameworks that are activated by you in order to provide the best performance.
You May Also Like

Controlling iOS Status Bar C ...
May 12, 2026

Hyper‑Personalized Web Ses ...
May 11, 2026

CSS-to-Status-Bar on iOS: Dy ...
May 10, 2026